Multi-node Application with PyTorch Distributed
Message Exchanging Example
Before we work on training a machine learning model across multiple nodes, I would first give you an idea of how to use PyTorch to communicate between nodes. As an introduction for writing distributed PyTorch applications across multiple nodes, let’s walk through an example of message exchanging on multiple nodes with PyTorch DDP. The code example (found in your downloaded files or on GitHub) is based on this PyTorch tutorial.
If we launch the Python script on 2 nodes on Frontera rtx nodes, each equipped with 4 GPUs,
WORLD_SIZE, which is total number of GPUs in your job, is 8,
GLOBAL_RANK, which is the ID for the GPU in your cluster, is [0, 1, 2, 3, 4, 5, 6, 7].
LOCAL_RANK, which is the local ID for the GPU in a node, is [0, 1, 2, 3].
Let’s assume we have these variables set for us already.
Communication Backend for torch.distributed
torch.distributed supports several built-in backends.
In our code we specified our communication backend to be “NCCL” dist.init_process_group(backend="nccl").
The NVIDIA Collective Communication Library (NCCL) implements multi-GPU and multi-node communication primitives optimized for NVIDIA GPUs and Networking. NCCL provides routines such as all-gather, all-reduce, broadcast, reduce, reduce-scatter as well as point-to-point send and receive that are optimized to achieve high bandwidth and low latency over PCIe and NVLink high-speed interconnects within a node and over NVIDIA Mellanox Network across nodes.
If we were running our application on hardware equipped with CPU only, the NCCL backend, which is exclusively developed for NVIDIA GPUs, would not work. We would need to change to the ‘gloo’ backend for communication between CPUs dist.init_process_group(backend="gloo").
Launching Multi-node Distributed Training: Now to set the environment variables
To set the environment variables including WORLD_SIZE, GLOBAL_RANK and LOCAL_RANK, we need to use mpirun and torchrun together.
Torchrun
To run multi-node jobs, we need to torchrun on each node. A torchrun command needs these environment variables to be set:
nproc-per-node: Number of workers per node
nnodes: Number of nodes
node-rank: Rank of the node for multi-node distributed training
master-addr: Address of the master node (rank 0). Here it is the hostname of rank 0.
master-port: Port on the master node (rank 0) to be used for communication during distributed training.
torchrun will create WORLD_SIZE, GLOBAL_RANK and LOCAL_RANK for each worker.
If we want to launch our job on two nodes (c000-001 and c000-002), we need to ssh into the two nodes and run the following commands:
The above example is suitable for the TACC Frontera machine, where each rtx node is equipped with 4 GPUs (nproc_per_node is 4).
Set Environment Variable with mpirun and Slurm
The torchrun launcher is all we need to launch a script on multiple nodes. Why do we want to use it in combination with mpirun and Slurm? We have to ssh on to each machine and manually modify the launch command on each node, and that is error-prone. With the help of mpirun and Slurm, we can launch the same job with only one command.
Message Passing Interface (MPI)
The Message Passing Interface (MPI) is a standardized and portable message-passing standard designed to function on parallel computing architectures [1]. Here we use MPI as a frontend for launching the job, communicating node information.
mpirun command
Open MPI is a MPI library project. The mpirun command is used here to execute parallel jobs in Open MPI.
We use an mpirun command line of the following form:
% mpirun [-np number-of-processes] [-ppn processes-per-node]
This command will run number-of-processes copies of <program>.
In the command line above:
-np sets the number of MPI processes to launch.
-ppn sets the number of processes to launch on each node.
As a concrete example, to run message_passing.sh on 2 nodes, we would use this command:

After we start the MPI application with the mpirun command, the command sets a number of built-in environment variables for us. One of the environment variables set is PMI_RANK. It is the rank of the current process among all of the processes that are created by the mpirun command. We will set node-rank argument for torchrun, which is the rank of the node for multi-node distributed training, as PMI_RANK.
Slurm
Slurm, or Simple Linux Utility for Resource Management, is a High Performance Computing (HPC) Job Scheduler that helps manage and allocates compute resources to make sure access is distributed fairly between users.
We use the Slurm command scontrol show hostnames to print hostnames for the job. With a list of host names, we can obtain the number of nodes for the job.
Finally, we have our script that can be launched with mpirun command from the master node. The “PRELOAD” part of the script launches a container with a Python environment set up for this tutorial. Containers allow you to package an application along with all of its dependencies, so they are very handy when we run code on HPC platforms like TACC. This tutorial will not go into details about containers, but TACC has tutorials available if you are interested in containers @ TACC.
Our mpirun command
launches 2 MPI processes, with 1 process launched on each one of the 2 nodes. Let’s say process 0 runs on node A, and process 1 runs on node B. Each process runs the message_passing.sh script.
In the message_passing.sh script, on accessing PMI_RANK, node A gets value 0, and node B gets value 1.
with
command, we get a list of host names. A concrete example of the output from this command is
This suggests we have a total of 2 nodes in this job, their host names are c000-001 and c000-002. We set the master address for torchrun command as c000-001.
Let’s assume node A with rank 0 uses host name c000-001. Node B with rank 1 uses host name c000-002. The full command launched on node A is:
/opt/apps/tacc-apptainer/1.3.3/bin/apptainer exec --nv --bind /run/user:/run/user /scratch1/07980/sli4/containers/cnn_course_latest.sif python3 -m torch.distributed.run --nproc_per_node 4 --nnodes 2 --node_rank=0 --master_addr=c000-001 --master_port=1234 message_passing.py
And the full command launched on node B is:
/opt/apps/tacc-apptainer/1.3.3/bin/apptainer exec --nv --bind /run/user:/run/user /scratch1/07980/sli4/containers/cnn_course_latest.sif python3 -m torch.distributed.run --nproc_per_node 4 --nnodes 2 --node_rank=1 --master_addr=c000-001 --master_port=1234 message_passing.py
Launching the code with mpirun -np 2 -ppn 1 message_passing.sh command, we get an output like this:
The above message exchanging example with PyTorch DDP showed us how to write distributed PyTorch application across multiple nodes. With the knowledge regarding torchrun and environment variables, we are almost ready for our goal for this tutorial: train a machine learning model across multiple nodes. Before we start to work on the code for training our model, I would like to mention that the point-to-point communication used in the example is different from the collective communication used in PyTorch DDP.
Point-to-Point Communication vs. Collective Communication
The above example uses point-to-point communication through send and recv functions. Point-to-point communication is useful when we want more fine-grained control over the communication of our process.

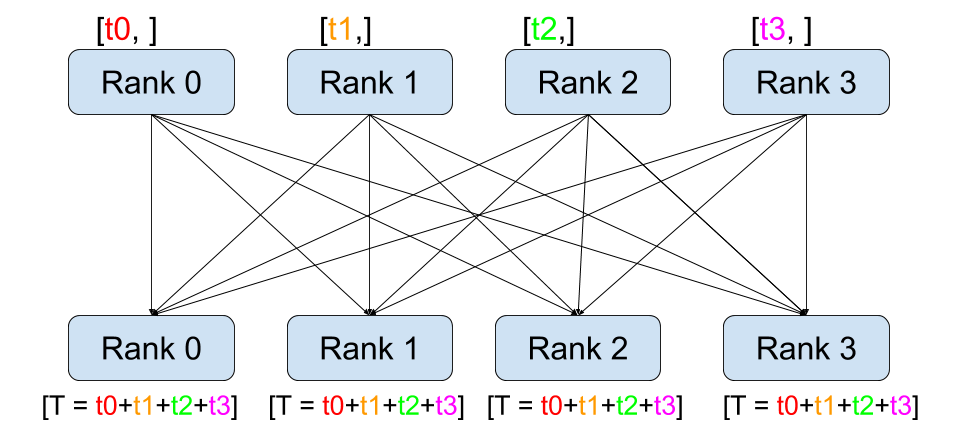
Remember PyTorch’s DistributedDataParallel uses collective communications instead of point-to-point ones: all gradients are synchronized by averaging gradients from each GPU and sent back to the individual GPUs via an Allreduce operation. The Allreduce collective communication applies on every tensor and stores results in all processes in the process group.
[1] “Message Passing Interface :: High Performance Computing”. hpc.nmsu.edu. Retrieved 2022-08-06
CVW material development is supported by NSF OAC awards 1854828, 2321040, 2323116 (UT Austin) and 2005506 (Indiana University)