The OpenStack REST API
The OpenStack API is implemented as a set of "web services" in the Representational State Transfer (REST) architectural style. An interaction with one of the services takes the form of sending a request (including formatted data) to a particular address on the server and then parsing the response (also formatted data). Both the data for the request and for the response will typically be formatted as JavaScript Object Notation (JSON).
API Endpoints (Ports) and URLs
Each of the Jetstream2 OpenStack API services can be reached through the same basic URL: https://js2.jetstream-cloud.org. However, each service listens for requests on its own port(s), also called service endpoints. Jetstream2 uses the default OpenStack service ports, with these being some of the most commonly used:
| Component | Name | Port | Version |
|---|---|---|---|
| Identity | keystone | 5000 | v3 |
| Networking | neutron | 9696 | v2 |
| Compute | nova | 8774 | v2 |
| Image | glance | 9292 | v2 |
| Block storage | cinder | 8776 | v3 |
The table also lists the version of each service on Jetstream2 as of this writing.
However, you should always check the current version of a service before starting to use it.
This can be done (without need for authentication) by performing a "GET" call to the service's endpoint.
For example, getting the Jetstream2 Identity service version
using curl (see below) would take the form:
curl -s https://js2.jetstream-cloud.org:5000 | python -m json.tool
Such requests return JSON data that can optionally be formatted by piping it to the Python JSON decoder. Each service returns different amounts of version information in different formats, so you will have to inspect it to see which version you should use.
Another way to see version and port information for Jetstream2's OpenStack services
is through the Horizon web interface at Project→API Access in the navigation tree
(see this direct link).
The base URL for calling any OpenStack service will be
the root URL for the server plus the service's port,
followed by the path to the desired version (such as /v3/ for the Identity service example above).
The methods described in the API documentation are added to this path,
and any URLs beyond the version specification will require authentication on the server.
When you have chosen a tool for calling the API (see the sections below),
Using the REST API will describe
how to authenticate on a server and call its API methods.
Tools for Calling the API
You may want to invoke the API in different ways depending on whether you are developing your application or running an application in production. While developing, an interactive mechanism is often helpful as you explore the way the API works and how you should be calling it. In production, such interaction is not needed, so a command-oriented tool is more useful.
Two recommended ways to interactively execute OpenStack API requests
are with the curl command line application
and with a graphical REST client.
Curl is an excellent way to issue API calls from within a script,
but it can be tedious to use when first learning about an API.
A graphical REST client makes it easier to build syntactically correct calls
while learning how to use an API, but can only be used in a graphical desktop environment.
Using curl
The curl application is available for many operating systems.
Once you have installed curl on your system,
you will need to open a shell from which to run it.
If you have configured an openrc.sh file
that specifies your Jetstream2 credentials,
you can execute it and then use the environment variables it defines when calling the API.
Those variables can be used with curl's options
to create an appropriate request to the Jetstream2 server.
The most useful options will be:
-
-Xspecifies the request method. Methods include GET, POST, PUT and DELETE. GET is the default if this option is not used. -
-Hspecifies a header of the form "name: value". This option can be specified multiple times to declare additional headers. -
-dspecifies the data string (typically JSON) that is needed for some requests. Note that line breaks cannot be included in such strings. -
-sspecifies that silent mode be used, which excludes the progress indicator from the command output. -
-ispecifies that the HTTP response headers should be included in the output. This option is needed when requesting an access token.
Using a Graphical REST Client
Free graphical REST clients are available as extensions for many web browsers (such as Chrome and Firefox) and as desktop applications (such as Fiddler). These tools let you easily enter the various components of an API request (URL, content type, parameters, body, etc.) and then compose and send the request and display the response. When choosing a REST client, look for some of these helpful features:
- Assistance with JSON: Ability to check syntax of request data and format response data.
- Ability to define variables and use them in requests, possibly allowing you to load variables from the operating system or a shell script.
- Ability to parse information from response data and headers into variables.
- Maintain a history of the calls you made, possibly allowing you to define actions that are saved between sessions for reuse.
- Display of a
curlcommand matching the API call you have defined through the client.
The example below executes the same API call that was used in the curl example.
The screenshot is from the
Advanced REST Client
application running on Windows.
The following steps were taken to execute the API call:
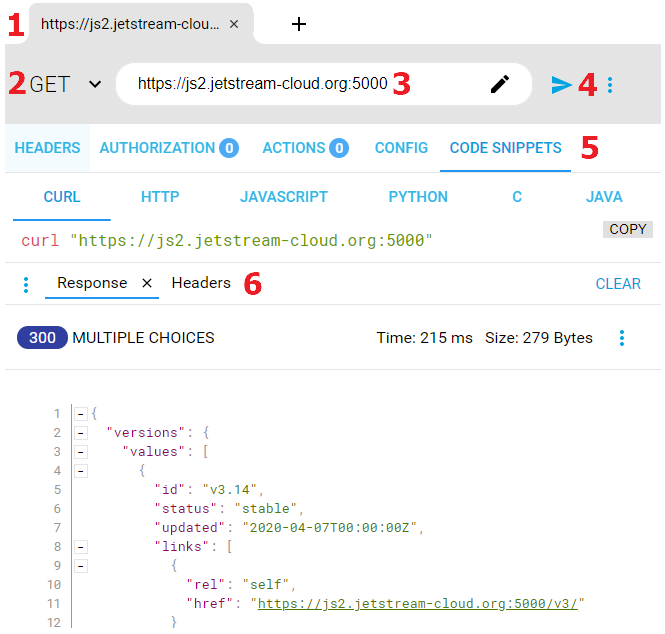
- The client allows you to work with multiple API calls at once, each in its own tab.
- The GET method was chosen. Some calls will use the POST, HEAD, PATCH or DELETE methods.
- The URL and path for the call were specified. URL parameters could be added/edited by clicking the pencil icon.
- The "Send" button was pressed to execute the call.
- If the command had been a POST, we would have been offered a place to enter its body here. Instead, we are viewing a "code snippet" of the CURL command that corresponds to the request.
- The response status and the command's JSON output are displayed. You can also choose to view the returned headers and other information.
CVW material development is supported by NSF OAC awards 1854828, 2321040, 2323116 (UT Austin) and 2005506 (Indiana University)