Camera Animations
The Animation View panel allows you to specify the elements of the visualization that will be animated. The bottom row of the panel (with the plus sign on the left) is used to add new elements. Each element that is added will have an "X" on the left, allowing you to remove it.

The following steps can be taken with any visualization data that you like. Begin to create an animated camera by selecting "Camera" in the dropdown on the left of the last row (1). Note that the other items in the dropdown are the names of the current Visualization Pipeline nodes. We will discuss animating node properties in the next section. After making a selection in the first dropdown, the second dropdown (2) is populated with appropriate values for that selection. For the camera, we may choose to animate it by orbiting around a point, by following a user-defined path or by following a path defined in the data. For this example, choose "Orbit".
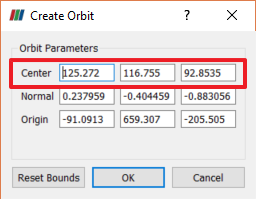
Before clicking the blue "+" on the left (3) to create the camera animation, click the node in the Pipeline Browser around whose center you wish to orbit. If no node is selected, you will need to enter your own orbit center. Also, zoom the camera to set the viewing angle for the camera orbit. Once these actions are performed, click the "+". You will be shown a "Create Orbit" dialog where you may edit the orbit's camera definition. Once you are sure the values are good (especially for "Center"), click "OK" and a new animation row will be created for the camera.

Note that in the upper left of the Animation View the mode is set to "Sequence" and in the upper right of the panel the number of frames is set to 10 by default. In the VCR Controls toolbar, press Play. The camera orbits the data very quickly! Now change the number of frames to 100 and press the Enter key, then press Play again to see a more reasonable animation. The "Sequence" mode will render exactly the number of frames you request, no matter how long it takes.

Now change the "Mode" dropdown to be "Real Time". Notice that you must now specify a "Duration" in the upper right of the panel, with the initial value being 10 seconds. In this mode, ParaView will render frames as fast as it can while ensuring that the animation will take exactly the stated duration. Press Play to see the Real Time animation.

CVW material development is supported by NSF OAC awards 1854828, 2321040, 2323116 (UT Austin) and 2005506 (Indiana University)