Running ParaView on a TACC System
After you have connected to a node through the Analysis Portal, your DCV or VNC viewer web page will display the node's Linux desktop. The desktop will contain an initial terminal window. Before running ParaView, you must use this window to load one or more modules into the environment. (Please be aware that the guidance that follows is based on TACC's ParaView page, which is updated periodically.)
On Stampede3, simply enter the following two commands in the terminal window to load the ParaView module and launch the client:
module load paraview; paraviewOn Frontera, several more modules are required to handle software rendering and ray-tracing for ParaView. First, issue the following command in the terminal window:
module load gcc/9.1.0 impi/19.0.9 qt5/5.14.2 swr/21.2.5 oneapi_rk/2021.4.0 paraview/5.11.1The above command, lengthy as it is, needs to be typed in manually. However, if you want to experiment with a copy/paste instead, you can start an xfce4-terminal from the initial terminal, copy the above text, click on the square symbol located in the upper left of the DCV desktop (see below), and paste the text into the DCV clipboard using the same menu or key sequence you would normally use in your local OS. Then, paste the DCV clipboard text into the xfce4-terminal window using either the right-click contextual menu, the Edit menu, or ctrl-shift-V. (If you are using VNC, the procedure is similar, but the clipboard is revealed using a pop-out menu from the left desktop edge.)
Why are these extra modules needed? The qt5 module is used to build ParaView's user interface.
The swr module allows the graphical output of ParaView to be shown over the DCV or VNC connection, via software rendering.
The ospray module provides ray tracing functionality for higher quality renderings in ParaView.
And the oneapi_rk module supplies some necessary supporting libraries.
Now issue the following command to start ParaView on Frontera.
swr -p 1 paraview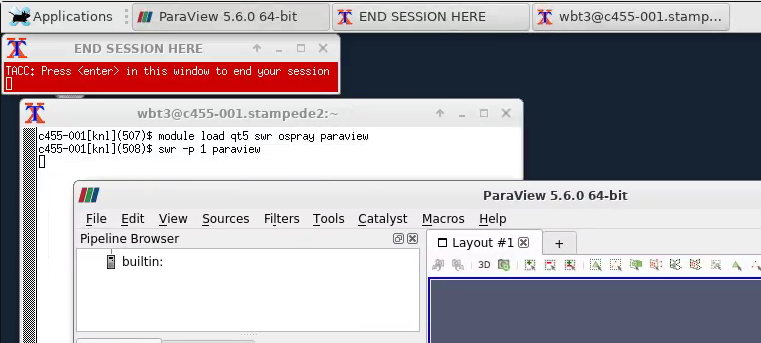
In the Pipeline Browser you can see that ParaView is initially connected to its "builtin" server. We want to connect it instead to a separate data/render server running on our TACC nodes. To start such a server, we must select or create a server configuration. To begin the connection/configuration process:
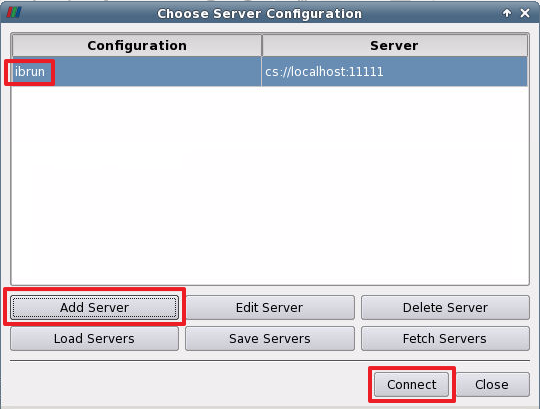
- Choose File→Connect to show the server choosing dialog.
- The Analysis Portal automatically creates a configuration called "auto" for you to use. You should first attempt to use this configuration.
- Select the existing "auto" configuration and click "Connect".
ParaView will now attempt to connect to the newly started server. Its progress should be displayed in some message boxes that appear. If it succeeds, the Pipeline Browser pane will display a new server connection in place of "builtin", and you can proceed to the testing page.
On Stampede3, all of this should just work. On Frontera, If the "auto" configuration fails to launch a ParaView server, follow the remaining instructions on this page to create and configure your own connection.
- To create a new connection, click "Add Server" in the dialog. (Do not click "Connect" yet.) This creates a new configuration that can then be used during later ParaView sessions. Give the new server configuration a name and click "Configure".
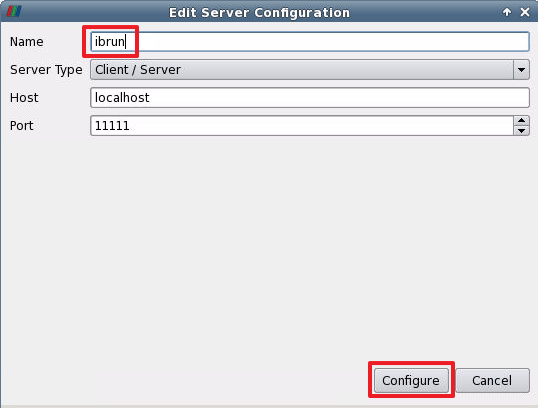
Now you must complete and save the configuration, then use it to connect to the server.
The configuration will specify that a pvserver process
should be started on each core of our nodes.
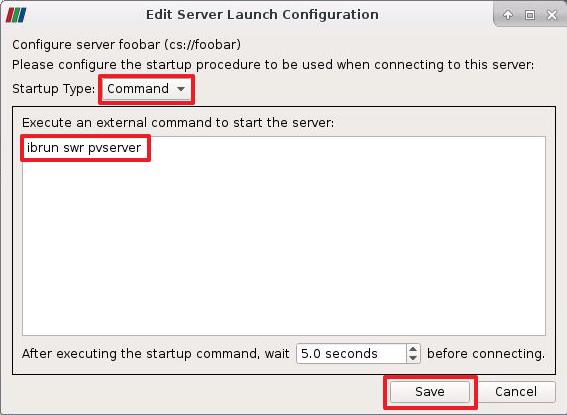
- In the configuration editing dialog, set Startup Type to "Command".
-
Type in this text as the external command (or you can follow the cumbersome copy/paste procedure outlined above!):
/bin/bash -c "module load paraview-osmesa/5.11.1 2>&1; ibrun swr pvserver" - Click "Save" to complete the configuration.
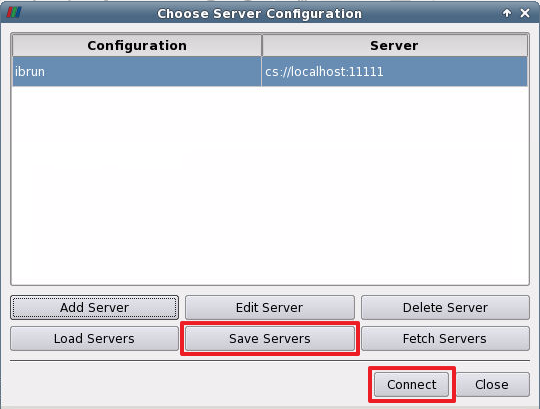
- In the configuration choosing dialog, click "Save Servers" to save the configuration for later reuse via "Load Servers".
- Click "Connect" to connect to the server.
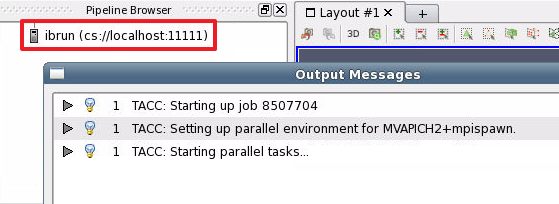
ParaView will now attempt to connect to the newly started server. Its progress may be displayed in the "Output Messages" window; to view this window, select "Output Messages" from the View menu. When you see that the Pipeline Browser displays the new server connection, you can close the Output Messages Window.
CVW material development is supported by NSF OAC awards 1854828, 2321040, 2323116 (UT Austin) and 2005506 (Indiana University)