Configuring an Instance
Once you have selected an image, you will be taken to
the Create Instance
view to configure the instance that will be created.
After making any necessary configuration changes, click Create at the bottom to create the instance.
That will return you to the main dashboard where you can track track the creation progress.
Configuration Options

In this example we can see that the Featured-Ubuntu22 image was selected.
You must enter a name for the instance that will be created (1).
It is recommended that you give each instance a unique, descriptive name.
If you don't care what the name is, click Random Name
to generate a name that is likely to be unique.
You must also select an initial Flavor
(or size
) for the instance.
This determines the number of CPUs and amount of RAM that the instance has.
The listed Root Disk
size is the minimum size for that flavor,
and you can choose a larger size using a later option.
You should study the VM sizes and costs table
to understand how the flavor you choose impacts the cost of running an instance.
Also be aware that you can easily change the flavor of an instance as your needs change.
You may plan to do your research work using flavor m3.large (16 CPUs),
but you do not need to create the instance with that more expensive flavor.
You can choose an initial flavor with 2 CPUs (m3.small),
which is sufficient for installing software, copying data and configuring the instance,
then resize
the instance to a larger flavor when necessary.
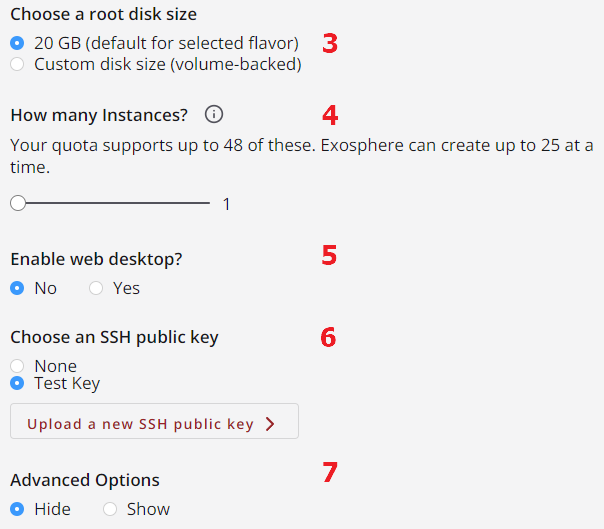
You can choose the size of the root disk
in your instance (3) or choose the default offering.
If you intend to install substantial software or if you will be working with a larger amount of data,
you may want to choose a size that is larger than the default,
which is typically set to hold the operating system with only a modest amount of free space included.
This choice is important, as it is not easy to later increase the size of a volume through the Exosphere web interface.
If you will be using a cluster of similar instances, you can create all of the instances at once (4).
Some images already include the packages necessary to provide a web desktop
,
which allows you to interact with the instance's graphical display through a web browser.
Those images that do not include a web desktop will include an option to enable this feature (5).
If you think you may want to use this feature, it is best to enable it at creation time,
which incurs small costs in disk space used and time to create the instance.
If a web desktop is enabled by default, this option appears in the Advanced Options section.
If you would like to have an SSH public key injected into the instance, you can select it here. Either choose one you have already uploaded to Jetstream2, or take a detour to upload a new one. If you do not include a public key at creation time, you can still add one manually after creation.
The remaining advanced
options, described below, can be shown (7).
Users will not typically need to change the advanced
settings in this section.
As the web page text cautions, some settings should only be altered by an expert user.
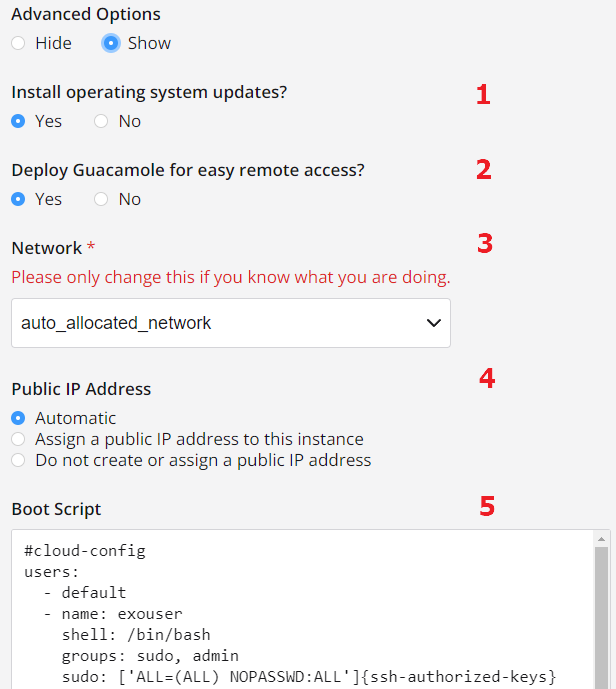
An image will be missing any system updates that were published after its creation. This is more commonly seen with custom images, snapshots and images of older OS versions. By default, the missing system updates will be applied during instance creation. If you know you won't need this updates and want the creation to be as fast as possible, you can disable the updates (1).
Guacamole is functionality that is installed by default on instances that have web desktops enabled to make it easier to interact with the desktop through a web browser. If you changed the option for a web desktop in your instance, you may want to change this option as well (2).
If you are an expert user and know why you need to change which network the instance will use, then this option (3) is for you. Otherwise, leave it alone!
Exosphere will assign a public IP address to your instance when you create it,
and you will need this address if you intend to interact with the instance from other internet locations.
The instance will retain the same IP address even after it has been shelved and unshelved.
If you think that you will need to have a fixed IP address that you can switch between instances,
you can assign it to this instance by selecting Assign a public IP address to this instance
(5).
That option displays all currently free IP addresses in the allocation and lets you create a new one if needed.
The Boot Script
in this text box (5) will be executed on the instance when it starts up.
This is another very advanced feature that should only be used by experts.
Video Instructions: Create and Configure Instance
CVW material development is supported by NSF OAC awards 1854828, 2321040, 2323116 (UT Austin) and 2005506 (Indiana University)